This article guides users on how to add a custom action to Bulk Actions in WordPress. It provides step-by-step instructions on creating an action to change the status of posts in bulk to “Draft”. Users need to add code to the functions.php file of their theme and handle the action using filter hooks. The article also includes instructions on displaying a custom message after the action is applied. By following these steps, users can efficiently manage their posts on WordPress. The author encourages sharing the article if it proves helpful and suggests reading other WordPress Tips articles.
Not just delete and edit, want to add a custom action to Bulk Actions? Then this article will help you do that.
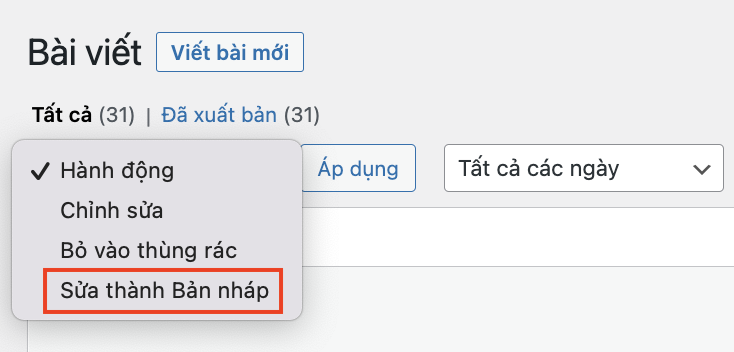
Here is the result you will get:

Add custom action
In this post, I will create an action to change the status of posts in bulk. More specifically, I want to change the status of posts to “Draft”.
You add the code below to the file functions.php of child or child theme.
add_filter( 'bulk_actions-edit-post', 'hk_custom_bulk_actions' );
function hk_custom_bulk_actions( $bulk_array ) {
    $bulk_array['hk_make_draft'] = 'Sửa thành Bản nháp';
    return $bulk_array;
}
In the code above, I use hook bulk_action-eidt-{$screen}. If you don’t want to create a custom action for a Post, change the value of $screen.
If it is Page, $screen will be page. More specifically bulk_actions-edit-page. Same goes for other custom post types.
Action handling
After successfully adding the action above Bulk Actions, the next thing you have to do is process that action. In this part, I will use the filter hook. handle_bulk_actions-screen. Similar to the above section, you have to change the variable $screen to suit your needs.
Add the code below below the code above.
function hk_bulk_action_handler( $redirect, $doaction, $object_ids ) {
    $redirect = remove_query_arg( array( 'hk_make_draft_done' ), $redirect );

    if ( $doaction == 'hk_make_draft' ) {

        foreach ( $object_ids as $post_id ) {
            wp_update_post( array(
                'ID' => $post_id,
                'post_status' => 'draft' // set status
            ) );
        }

        $redirect = add_query_arg(
            'hk_make_draft_done',
            count( $object_ids ),
        $redirect );

    }

    return $redirect;
}
Notification after action is applied
This is the final step, you will create a custom message after your action is applied. Similar to the two parts above, add the following code to the file functions.php.
add_action( 'admin_notices', 'hk_bulk_action_notices' );
function hk_bulk_action_notices() {
    if ( ! empty( $_REQUEST['hk_make_draft_done'] ) ) {
        echo '<div  class="updated notice is-dismissible">
            <p>Trạng thái bài viết đã được cập nhập.</p>
        </div>';
    }
}
This is the result you will get:

Epilogue
I hope the above article will help you better manage your posts on WordPress. If this article is useful and saves your time, please help me share it. Also, if you are interested in similar topics, read other WordPress Tips articles and follow Fanpage so you don’t miss new posts from me.


