Google DNS is highly rated for its speed and stability, but changing it can help in cases like broken fiber optic cables or errors related to Google services. This article provides instructions on changing Google DNS on a Macbook with Mac OS Catalina. It involves selecting the Network window from the System Preferences menu, navigating to the DNS tab, adding Google IP addresses, and clearing the old DNS cache. If the changes don’t work, restarting the system or resetting the DNS configuration on the network router may be necessary. Other trusted DNS options are also mentioned. Readers are encouraged to ask questions in the comments section.
Changing Google DNS on Macbook
Google DNS is one of the best DNS today, known for its high speed and stability, trusted by many users. In cases of issues like broken fiber optic cables or errors related to Google services, changing Google DNS can help resolve these problems. Today, minhduy.vn will guide you on how to change DNS settings on Macbook!
Instructions to change Google DNS on Macbook:
-
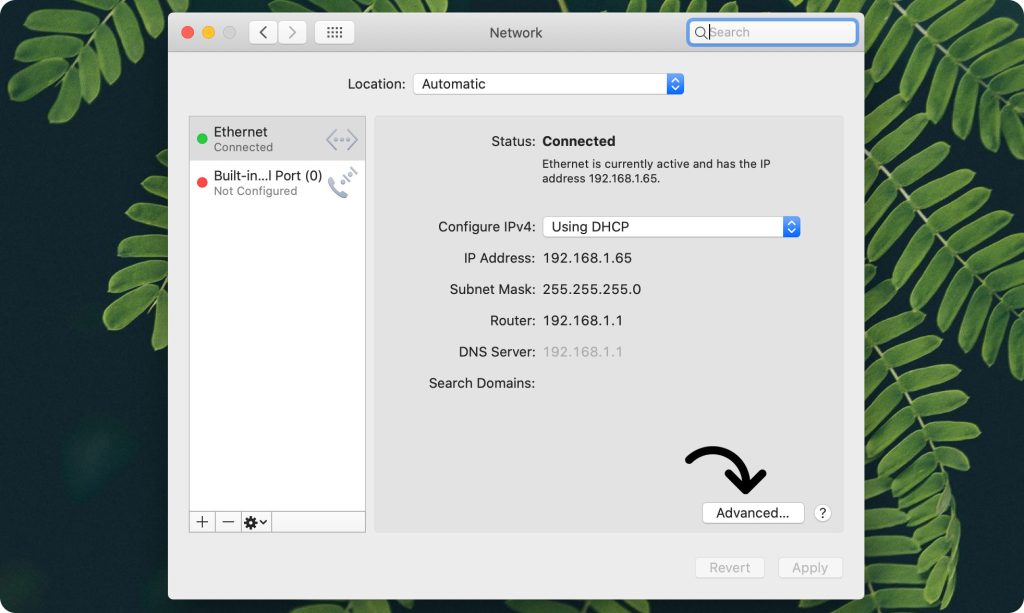
To change DNS server settings on Mac OS Catalina, navigate to the Network window in the System Preferences under the Apple icon in the Menu bar.
-
Once in the Network window, select the type of network connection you are using and modify the DNS configuration accordingly. For example, if using a wired network, adjust the Ethernet settings.
- In the Network window, locate the Advanced section in the bottom right corner, click on it, and then switch to the DNS tab.
-
-
Under the IPv4 or IPv6 addresses section, click on the (+) icon and add the following Google IP addresses:
- For IPv4: 8.8.8.8 and 8.8.4.4
- For IPv6: 2001:4860:4860::8888 and 2001:4860:4860::8844
-
Click OK, then Apply to save the changes. To ensure the new DNS settings take effect, clear the old DNS cache by following these steps:
-
Go to Applications folder, Utilities folder, and open Terminal (or use Spotlight to locate Terminal).
- In the Terminal window, enter the command
sudo dscacheutil -flushcacheand press Enter. You may need to enter the Admin password when prompted.
-
- Restart the system if needed: If the changes do not take effect, consider resetting the DNS configuration on the network Router you are using by accessing its IP address.
In addition to Google DNS, there are other trusted DNS options available. For more information, refer to the related article.
Thank you for reading! If you have any questions, feel free to leave them in the comments below!


